Wednesday, November 29, 2006
Checking In...Again!
I just couldn't find time to add anything to the blog since my last posting. This was mostly due to the Thanksgiving holiday and my birthday (the Big Five O) on the 26th. Just too many things going on to spend much time here!
There may not be another update with pictures until possibly this coming weekend. I'm patiently awaiting the arrival of a NEW digital camera and that should make some improvement on the quality of my pictures. I bought the old camera (Sony Mavica FD85 with a whopping 1.3 MP) almost exactly 6 years ago and it's really not up to the task anymore. The new one is a Canon Powershot S2 IS 5 MegaPixel Digital Camera with 12x Optical Image Stabilized Zoom...ain't that a mouthful? This camera claims to have not only a macro setting, but also a super macro setting that will focus from ZERO centimeters to 10cm. The camera also has a bunch of other bells and whistles, but one of the features that really caught my attention is that it can take other lenses and filters like a regular film 35mm SLR. Also, there are more manual adjustments that can be made with it than were available on my old one, so that will give me even more flexiblitly and seem more like a "real" camera than merely a "point and shoot" device.
Oh, yes...this is an early Christmas present to myself (mostly) and to the household as well. The missus claims dibs on the old one, but I'm seriously not sure the old thing will last. (That's the camera, not the missus, just to be clear.)
Until next time...
Patrick
Friday, November 17, 2006
Checking In
Just a quick note to let those of you who stop by that I haven't abandoned the blog. I've gotten sidetracked by a couple other projects and various other responsibilities so I just haven't had the time for doing anything here.
With luck, I'll have a substantial update this coming weekend; this will probably be sometime on Sunday as I've got plans to be out of town for most of the day on Saturday (although these plans aren't written in stone.)
Until next time...
Thursday, October 26, 2006
Old Glory 10mm Resin Buildings Should Arrive Today
According to the tracking information sent to me by Old Glory, my European and ACW buildings should arrive sometime today. I thought about making my own buildings, but I just couldn't see how I could fit in building those with everything else I have going on at the moment. (Besides, the 40% Old Glory Army discount makes buying the buildings a bit easier to justify.)
I have to admit that I'm not terribly impressed with the pictures I've seen of the finished product. Some of the European buildings look like they have exaggerated stucco texture on the walls while other detail seems to be a bit soft. With luck, I can correct some of this with the prudent use of a Dremel tool and a little recarving. Even with a bit of reworking, it's bound to take less time than if I was scratchbuilding them (at least I hope it will!)
Also, the paint jobs on most of the buildings in these pictures I've seen online (except for some of the ACW stuff) aren't all that good with odd color choices and a rather gloppy-looking application of paint. I'm hoping that my ability to paint buildings will overcome some of the apparent deficiencies as I rather enjoy painting buildings and I've been told I'm fairly good at it.
If the UPS man is following his normal route, I may not have these buildings in my hot little hands until late this afternoon or early evening (it's not unusual for him to finally show up sometime between 6 and 7 PM although he has surprised me a few times and delivered packages by 2PM or so.)
In any case, I'll post some before and after pics of the buildings eventually.
Until next time...
Wednesday, October 25, 2006
ACW Project: The First Confederate Brigade

Tuesday, October 24, 2006
A Quick Update
I'm sorry I haven't paid much attention to the blog lately, but I've been busy with other things these past days. However, I have been able to get some painting done and I can now say I have a four regiment Confederate brigade complete with brigadier general (who happens to have more than a passing resemblance to Stonewall Jackson.) I hope to have some pictures up later on today.
I've also started on more Union regiments to make another four regiment brigade. (This is another big push involving the painting of 151 figures.)
I've also managed to paint up 8 25mm Essex viking figures I bought off of Alte Fritz a few weeks ago. I'm not sure if I'll put pictures of those here since they are off topic, but we'll see. (Lots of fun to paint, too.)
Until next time...
Thursday, October 05, 2006
WSS Project: Bavarian Cuirassiers
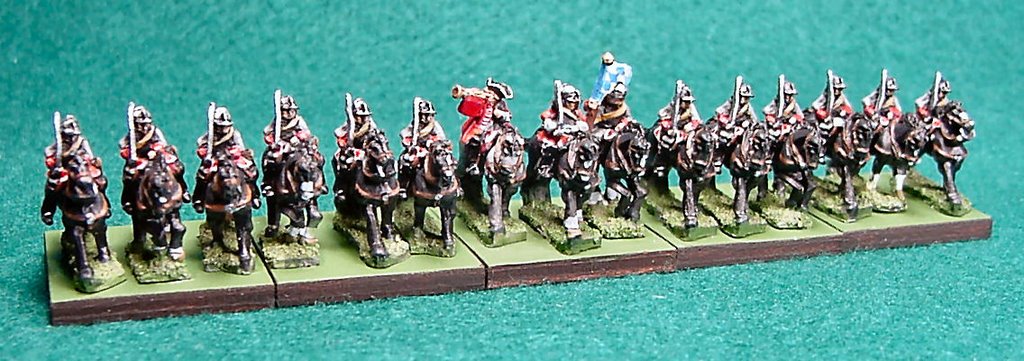
 (Click on picture to enlarge in a new window.)
Thursday, September 28, 2006
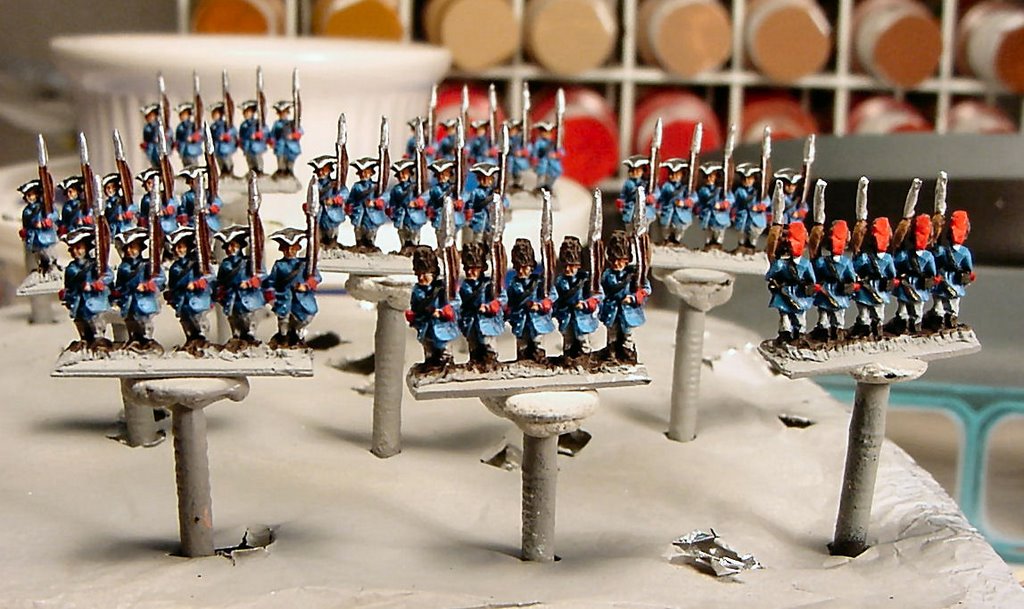
WSS Project: Bavarian Infantry Completed

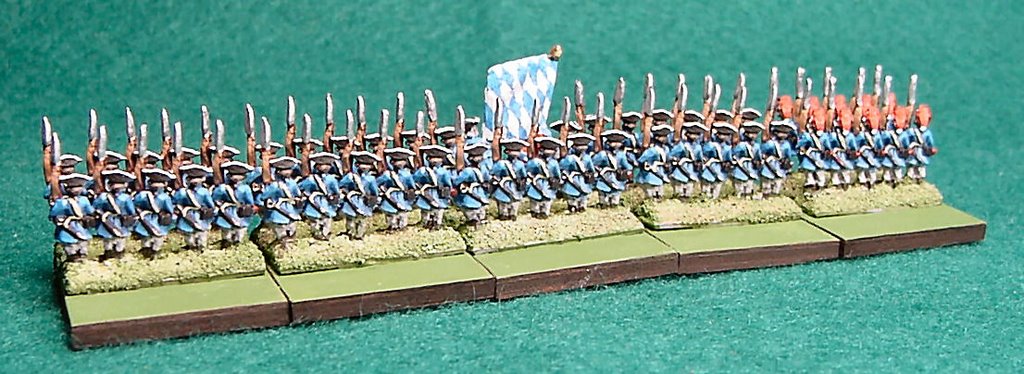 (Click on picture to see larger version in a new window)
Monday, September 25, 2006
Tools of the Trade
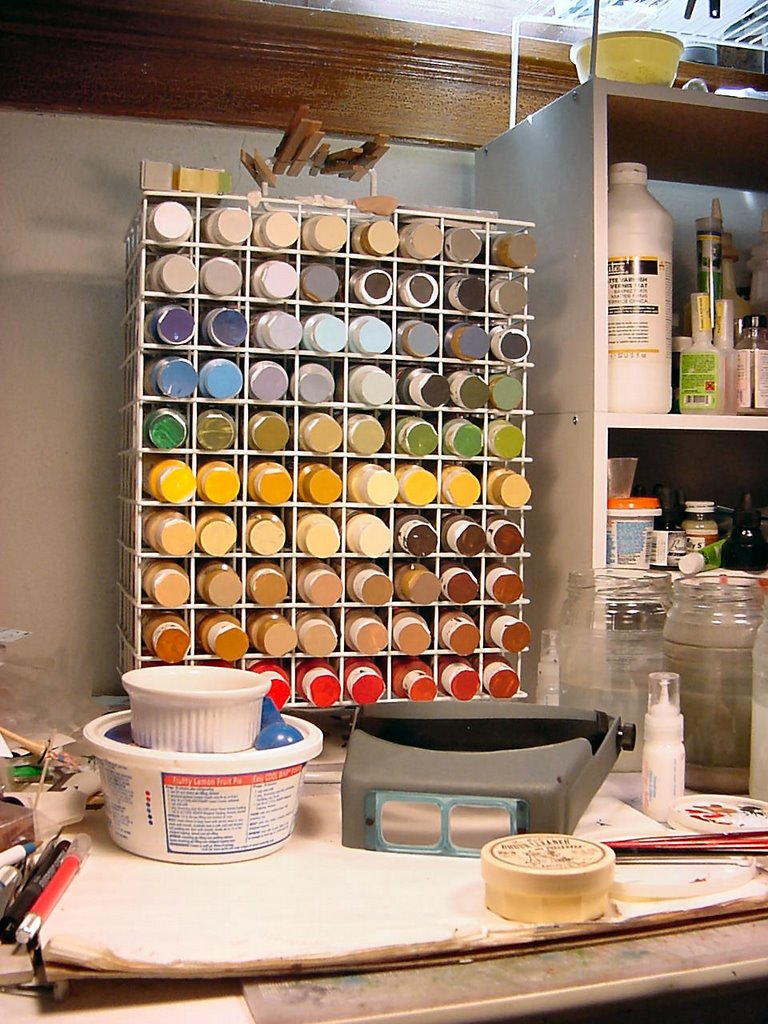 Here's a picture of a small — and somewhat tidy — section of my worktable showing my main tools for painting.
99.9% of the paint I use is of the "craft" acrylic variety and they all come in similarly shaped 2-ounce bottles. A couple years ago I bought one of these nifty rotating paint racks; each side holds 80 bottles and both sides of mine are fully stocked. The side showing in this picture is the side with the most frequently used colors and they're roughly organized into color groups.
I used to have the bottles stuck in the rack with the bottom of the bottle showing, but I decided to turn the bottles around and put samples of the paint right on their caps; this gives me a more accurate way of judging what the colors look like when they're dry. (Some of the bottles are a transparent but slightly milky-looking plastic that interferes with the true color of the paint and some of the colors dry a bit darker than they look when wet, so it's good to see the true appearance of the final color.)
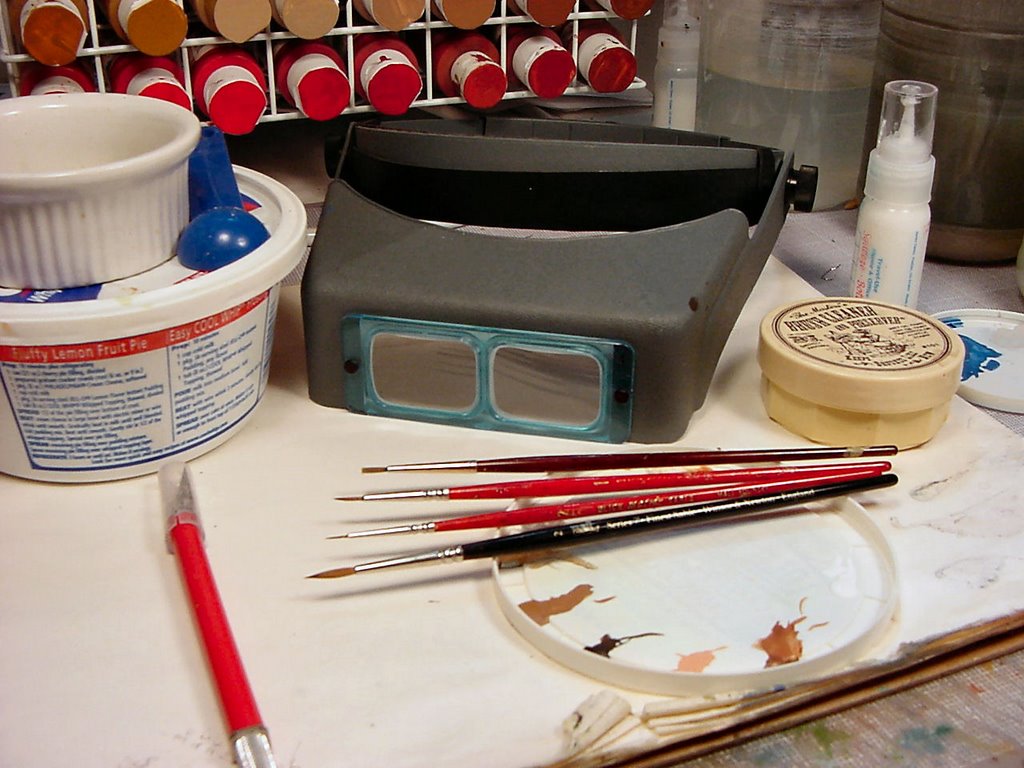 Here's a closer view of the main tools. Of all the things in this picture, the one item that's made the most difference in how I paint has to be the Optivisor: I honestly couldn't paint without it.
I had a less expensive magnifier, but it had plastic lenses and the headband was essentially just a springy clamp that hugged my head. It was adequate but I finally decided to upgrade to the Optivisor because the lense plates are high-quality optical glass and the headband is fully-adjustable and, therefore, more comfortable. Also, the cheaper one didn't have the eyeshade feature and it really makes quite a difference when you can work directly under the lights and not have the light shining down directly into your eyes (less eye fatigue.) I use a 2x lens plate; I originally bought a 2.5x (or was it a 3x?) plate but the working distance was just too close. (The 2x plate allows me to hold whatever I'm working on about a foot away from my face before it goes out of focus.)
In front of the visor, you can see a selection of brushes. The one in front is a #2 Winsor & Newton (excellent brushes); the two with the red handles are from Dick Blick Master Sable Series — #00 and #1 (also excellent quality bristles, but the handles aren't as durable). The last brush is a "beater" synthetic bristle item I use for spreading matte varnish for basing, occasional dry-brushing and it's also my "oops" brush that I keep nearby to correct any mistakes while the paint is still wet (I just make it moist and remove the problem paint); the stiffer bristles on this brush make it well-suited for these tasks.
The round container is The Masters Brush Cleaner and Preserver. It does a great job of removing built-up paint in the bristles near the ferrule and will even remove dried paint with some effort and patience. I use it regularly and it's really helped lengthen the life of many of my better brushes (I've had the same W&N and Blick brushes for 4 years or so and they're still going strong.
I use three different jars of water for cleaning my brushes. These are quart-sized glass pickle jars; one is for metallics, the second one is for first cleaning (or second cleaning of a brush used for metallics) and the third jar is the final rinse. Each jar is filled fairly full (the ones in the picture are in need of emptying and refilling) with tap water and a drop or two of Dawn dishsoap (washing up liquid for our UK friends.) The relatively large volume of water means I have to change it less often and it also allows me to give the brushes a really good swish without worrying about knocking over the jar. When I'm done painting, I usually put a spare plastic lid over each jar to keep the water from evaporating too quickly and to keep out various insects that seem attracted to them (spiders seem particularly prone to drowning in them for some reason.)
Speaking of plastic lids, I use white ones from containers of yogurt or cottage cheese as palettes. I particularly like the ones that have the little reinforcement ridges around the outer lip of the lid; these make very convenient wells for drops of paint and my ever-present "magic wash" mixture of Future acrylic floor finish and water. Once the palette is filled with dried paint, I take it and chuck it into a plastic bowl containing Simple Green cleaner and water and let it soak after snapping on the bowl's lid. When I start running out of lids, I take out the ones that were soaking and toss in the next batch. The ones that have soaked (often for days at a time) clean up with a quick rinse under warm tap water and a light scrubbing with an old toothbrush; after rinsing in clean water, I just blot them dry and they're ready to go again.
The small plastic squirt bottle behind the brush cleaner is something I picked up at a craft store. I keep a small quantity of Liquitex Matte Varnish in it and it's great for dispensing small amounts for basing and gluing (the varnish is an excellent adhesive, too.)
The plastic bowl and ramekin on the left of the picture hold my supply of beach sand. The ramekin holds the fine sand after sifting the stuff in the big bowl through an old tea strainer. This is what I use instead of flocking around the feet of the 10mm figures. The blue plastic measuring spoon is used for scooping the sifted sand and pouring it over the figures' bases after applying the adhesive; it helps me to get the sand where I want it without making a mess of things. (Pictures and description of this step will follow soon.)
Well, that's probably enough for today's posting; you can wake up now...
WSS Project: Bavarian Infantry in Progress
 (Click on picture to view larger image in a new window)
- Carefully draw the lozenge pattern on both sides of the flag, then even more carefully paint the blue lozenges over a white field. (I could make the lozenges oversized to make drawing and painting them less tedious.)
- Make a color decal of the pattern and apply that instead of painting, or,
- Make a decal of just the lines of the pattern and then paint in the blue lozenges.
At this point, I'm leaning toward the first option listed as it might be the fastest. I do have decal paper in both clear and white, so I could use the clear sheet printed with blue lozenges and apply it over a white painted field, or I could go with the white sheet printed blue (not sure there's much of a difference one way or the other, really.) I've never used the decal paper in this manner so it might be an interesting experiment; I guess I'll have to ponder this for a while.
I did keep track of how long it took to paint the figures to the point you see in the picture and I was quite surprised that it took much longer than I originally thought. I thought the average time for the other infantry units was about 3 hours or a bit less, but my records for the Bavarians show that it took 4 hours and 15 minutes (and I was very careful to record my times.) As I said earlier, I still have the command strip to finish, but that's just the standard bearer, drummer and officer; the two musketeers on either end of the command strip are painted to the same point of completion as the rest of the soldiers. Once I settle on how I'm going to do the flag, I suspect I'll need the better part of an hour to finish those three figures as they each need different kinds of uniforms and those don't lend themselves to much of an assembly line process.
After the painting is all done, I'll finish the bases of the figures with my usual sand and paint method and I'll show some of that process, too.
Stay tuned for more...
Saturday, September 23, 2006
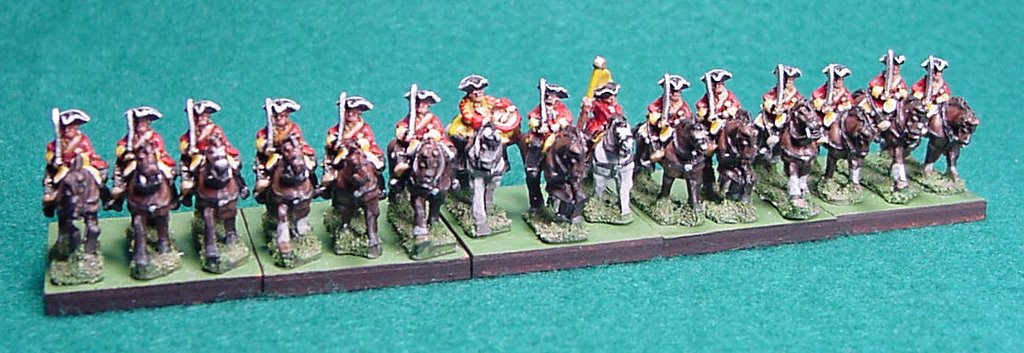
WSS Project: First English Dragoon Unit
(Click on picture to enlarge in another window)
Here the first cavalry unit; in this case it's a generic dragoon unit with yellow facings. I've decided that I'm going to go with fairly generic units in situations where details like specific flag designs are unknown or hard to come by. Actually, there seems to be quite a bit of leeway in painting most units as historical records are often missing or contradictory.
In the case of cavalry standards, I've opted for making them the same color as the facings and not worrying too much about embellishing them with other designs as they just don't have the surface area of the infantry flags and trying to do so could be considered masochistic.
Another thing I'm not sure of are the relative positions of the officer, ensign and drummer. The way I have them arranged probably isn't correct, but I thought it better to place the drummer with the drum toward the interior of the stand instead of putting him where I have the ensign so the instrument is protected from bumping and possible damage.
Also, I decided not to bob the horses' tails even though that became common practice for English cavalry in this era. Once again, it just seemed like too much fiddly work and the painting is fiddly enough as it is!
So there's another unit done in the WSS project. (I've also completed another English infantry unit; I don't see the need to post a pic of it on its own as it's much the same as the first one, but you can expect to see it once I've painted a couple more and have enough to represent a brigade.)
More to follow...
Friday, September 22, 2006
How Do You Paint These, Anyway?
I'll spend some time discussing techniques and tools but mostly I'll let the pictures do the talking. I won't record every little detail of the process ("Here's picture #110 where I painted the cravats on Lord Fumblefutz's Regt. of Foot.") as that would bore my readers and myself to tears, but I will cover the major steps (if I don't forget to take the pic before moving on to something else, that is!)
I'm also going to try to keep track of the amount of time it takes to complete a unit as I've been asked about that, too. If I end up forgetting to make an accurate record of the time spent, I hope I will be forgiven as I've never tried to integrate my painting with blogging and it'll take some time to work out the breaks between painting, picture taking and writing/posting.
So, stay tuned. I'll be posting more soon.
Monday, September 18, 2006
The ACW Project: The First Federal Unit
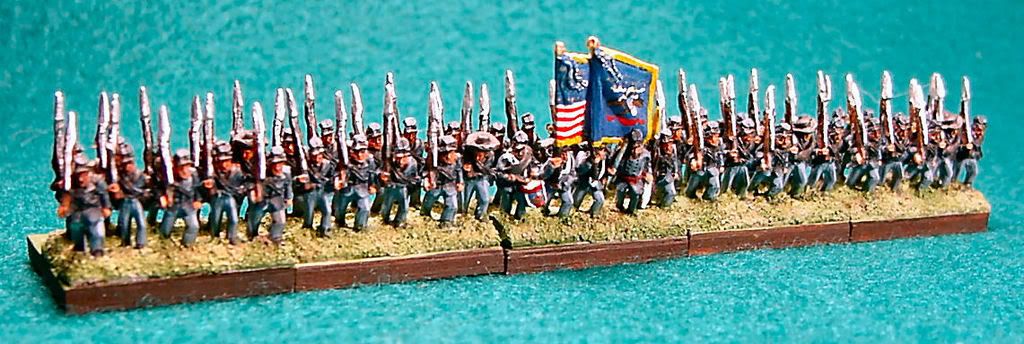
As stated, this is the first unit of Federals and they were as easy to paint as the Rebs except for the flags. Like the WSS range, the ACW figures also have the flags cast as part of the strip and it would be difficult to modify them enough to let me use paper flags.
Actually, once I got down to it and started painting them, it wasn't as dreadful of a task as I thought it might be. Like most apparently difficult things, it becomes less difficult if it's broken down into basic elements, so that's what I did. After painting this pair of National and Regimental colors the next set should come more easily.
The ACW Project: The First Confederate Unit
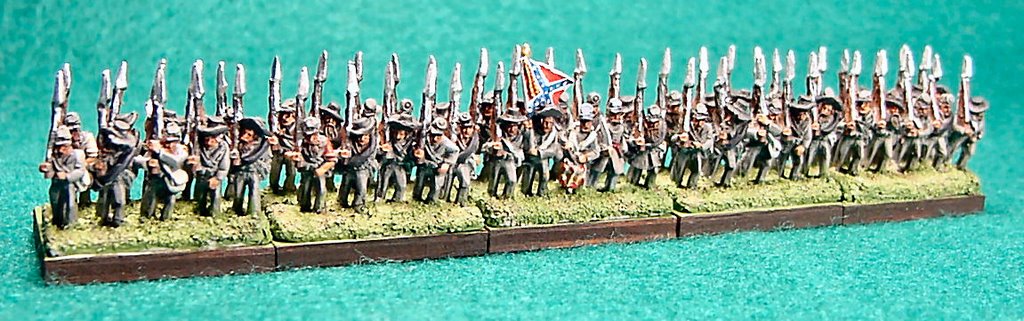
As promised, here are some pictures of the other 10mm project I have going. As you can see, the ACW figures show a bit more individuality and animation than the WSS figures, but that's as it should be, I suppose.
The Rebs are painted a bit more uniformly than others I've painted in the past. Current thinking is that the Confederates in the Eastern Theater were certainly ragged in 1862, but by 1863 they were much better dressed. Since I've decided to assemble forces to represent those present at Gettysburg in 1863, I thought I might as well go with this research in mind, so you won't see a lot of difference within a particular unit (other than differences in headgear and the odd shirt here and there), but I will paint the units in various shades of gray to indicate different sources of material for the uniforms. Also, it's generally believed that the oft-mentioned butternut color is actually the result of gray dyes fading and uniforms becoming dirty while on campaign. Another little factoid I've come across recently is that while the Rebels did make use of captured uniforms, these were often re-dyed to more closely match Confederate uniform colors, so you'll be seeing a lot fewer "sky blue" trousers on the Rebs than I might have painted before learning this.
Sunday, September 17, 2006
The Second Unit: Piedmont

Since my main wargaming opponent has absolutely no interest in painting miniatures, it's up to me to provide both sides, so here's the first unit of French infantry. One thing I haven't been able to find out is what (if any) distinctions existed between the ordinary "hat men" and the grenadiers so all of the non-command figures are painted the same. It seems that the French grenadiers, for the most part, didn't have the distinctive headgear (usually some sort of mitre or bearskin) used by many nations, and more's the pity in that I bought a few bags of grenadiers in fur bonnets thinking I could use them for the French. I guess I'll have to save those for the Bavarians or something. If anyone reading this should happen to know what distinctions in dress were used by the French grenadiers, please let me know via the "comments". Thanks!
Not much more to add here in that the figures are essentially the same as the ones I used for the English unit. In a perfect world, these "French" infantry should have a belly box for their cartridges instead of having the cartridge box on the crossbelt as they do, but the French did use that type of kit a little earlier in the period, so I could justify their appearance by saying that regiment's owner is a cheap s.o.b. and just hasn't gotten around to getting his regiment up-to-date...yeah, that's the ticket. (BTW, the Grand Scale catalogue has a listing for French infantry, but they aren't available and there hasn't been any reply from Old Glory regarding my email asking about them and the baggage wagons which are also listed, but as yet, unavailable.
The First Unit: The Buffs

This is a picture of the first unit I painted. (Click on the pic to see a much larger version.) The figures are cast in strips approximately 1-inch long and are mounted two strips per base. The bases are wooden, 3mm thick, laser- cut and 1-inch square; they were purchased from Litko. The bases in this picture hadn't received the finishing edge painting using burnt umber acrylic paint. The area around the figures' feet is fine sand glued in place with Liquitex acrylic matte varnish, then it was painted using a thin wash of green acrylic (Ceramcoat Seminole Green), and once that was dry, random dots of very thin brown acrylic wash (Americana Mississippi Mud) were applied to add some variation and give the "grass" a more natural look.
The unit is painted to represent the English 3rd Regiment of Foot (a.k.a. the Buffs) although with figures this size, it's very difficult and, frankly, unnecessary to attempt to paint such distinctions as lace as all such detail becomes invisible when viewed at normal playing distances. The effort here was to paint figures that look good on the table without becoming a "button counter."
What's All This?
I intend to use this blog to track my progress in creating wargaming armies using 10mm figures from Old Glory Miniatures (the Grand Scale 10/ Magnificent Little Soldier Co. 10s range.)
Right now, I have two projects going: I'm slowly painting units for the War of Spanish Succession and the American Civil War. Both of these are being created to use with the newly published Field of Battle rules by Brent Oman from Piquet. I'll be posting pictures of the few units I've finished very soon.
![]()