Saturday, September 23, 2006
WSS Project: First English Dragoon Unit
(Click on picture to enlarge in another window)
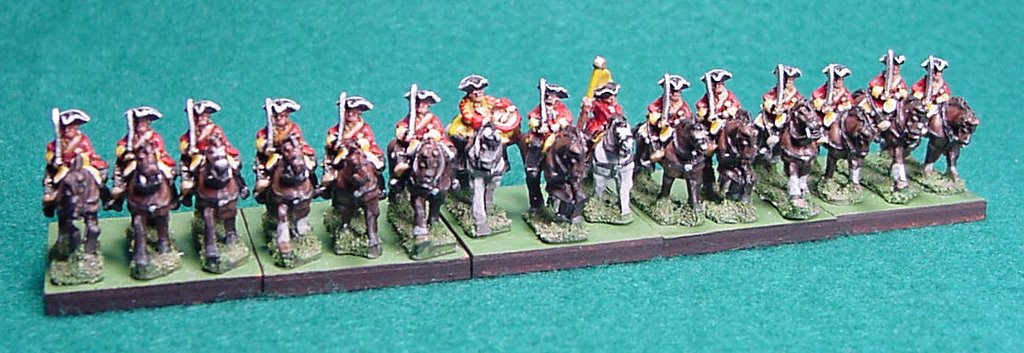
Here the first cavalry unit; in this case it's a generic dragoon unit with yellow facings. I've decided that I'm going to go with fairly generic units in situations where details like specific flag designs are unknown or hard to come by. Actually, there seems to be quite a bit of leeway in painting most units as historical records are often missing or contradictory.
In the case of cavalry standards, I've opted for making them the same color as the facings and not worrying too much about embellishing them with other designs as they just don't have the surface area of the infantry flags and trying to do so could be considered masochistic.
Another thing I'm not sure of are the relative positions of the officer, ensign and drummer. The way I have them arranged probably isn't correct, but I thought it better to place the drummer with the drum toward the interior of the stand instead of putting him where I have the ensign so the instrument is protected from bumping and possible damage.
Also, I decided not to bob the horses' tails even though that became common practice for English cavalry in this era. Once again, it just seemed like too much fiddly work and the painting is fiddly enough as it is!
So there's another unit done in the WSS project. (I've also completed another English infantry unit; I don't see the need to post a pic of it on its own as it's much the same as the first one, but you can expect to see it once I've painted a couple more and have enough to represent a brigade.)
More to follow...
Friday, September 22, 2006
How Do You Paint These, Anyway?
I'll spend some time discussing techniques and tools but mostly I'll let the pictures do the talking. I won't record every little detail of the process ("Here's picture #110 where I painted the cravats on Lord Fumblefutz's Regt. of Foot.") as that would bore my readers and myself to tears, but I will cover the major steps (if I don't forget to take the pic before moving on to something else, that is!)
I'm also going to try to keep track of the amount of time it takes to complete a unit as I've been asked about that, too. If I end up forgetting to make an accurate record of the time spent, I hope I will be forgiven as I've never tried to integrate my painting with blogging and it'll take some time to work out the breaks between painting, picture taking and writing/posting.
So, stay tuned. I'll be posting more soon.
Monday, September 18, 2006
The ACW Project: The First Federal Unit
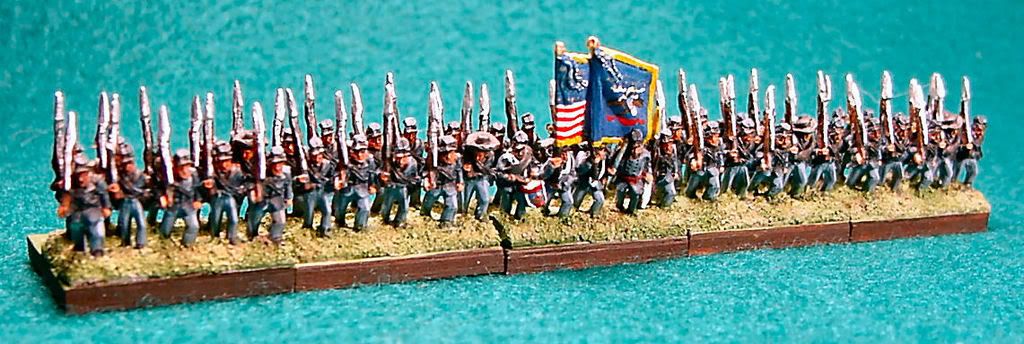
As stated, this is the first unit of Federals and they were as easy to paint as the Rebs except for the flags. Like the WSS range, the ACW figures also have the flags cast as part of the strip and it would be difficult to modify them enough to let me use paper flags.
Actually, once I got down to it and started painting them, it wasn't as dreadful of a task as I thought it might be. Like most apparently difficult things, it becomes less difficult if it's broken down into basic elements, so that's what I did. After painting this pair of National and Regimental colors the next set should come more easily.
The ACW Project: The First Confederate Unit
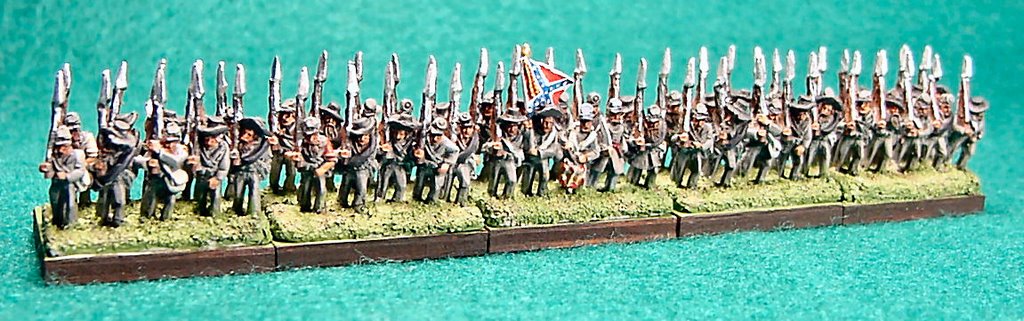
As promised, here are some pictures of the other 10mm project I have going. As you can see, the ACW figures show a bit more individuality and animation than the WSS figures, but that's as it should be, I suppose.
The Rebs are painted a bit more uniformly than others I've painted in the past. Current thinking is that the Confederates in the Eastern Theater were certainly ragged in 1862, but by 1863 they were much better dressed. Since I've decided to assemble forces to represent those present at Gettysburg in 1863, I thought I might as well go with this research in mind, so you won't see a lot of difference within a particular unit (other than differences in headgear and the odd shirt here and there), but I will paint the units in various shades of gray to indicate different sources of material for the uniforms. Also, it's generally believed that the oft-mentioned butternut color is actually the result of gray dyes fading and uniforms becoming dirty while on campaign. Another little factoid I've come across recently is that while the Rebels did make use of captured uniforms, these were often re-dyed to more closely match Confederate uniform colors, so you'll be seeing a lot fewer "sky blue" trousers on the Rebs than I might have painted before learning this.
Sunday, September 17, 2006
The Second Unit: Piedmont

Since my main wargaming opponent has absolutely no interest in painting miniatures, it's up to me to provide both sides, so here's the first unit of French infantry. One thing I haven't been able to find out is what (if any) distinctions existed between the ordinary "hat men" and the grenadiers so all of the non-command figures are painted the same. It seems that the French grenadiers, for the most part, didn't have the distinctive headgear (usually some sort of mitre or bearskin) used by many nations, and more's the pity in that I bought a few bags of grenadiers in fur bonnets thinking I could use them for the French. I guess I'll have to save those for the Bavarians or something. If anyone reading this should happen to know what distinctions in dress were used by the French grenadiers, please let me know via the "comments". Thanks!
Not much more to add here in that the figures are essentially the same as the ones I used for the English unit. In a perfect world, these "French" infantry should have a belly box for their cartridges instead of having the cartridge box on the crossbelt as they do, but the French did use that type of kit a little earlier in the period, so I could justify their appearance by saying that regiment's owner is a cheap s.o.b. and just hasn't gotten around to getting his regiment up-to-date...yeah, that's the ticket. (BTW, the Grand Scale catalogue has a listing for French infantry, but they aren't available and there hasn't been any reply from Old Glory regarding my email asking about them and the baggage wagons which are also listed, but as yet, unavailable.
The First Unit: The Buffs

This is a picture of the first unit I painted. (Click on the pic to see a much larger version.) The figures are cast in strips approximately 1-inch long and are mounted two strips per base. The bases are wooden, 3mm thick, laser- cut and 1-inch square; they were purchased from Litko. The bases in this picture hadn't received the finishing edge painting using burnt umber acrylic paint. The area around the figures' feet is fine sand glued in place with Liquitex acrylic matte varnish, then it was painted using a thin wash of green acrylic (Ceramcoat Seminole Green), and once that was dry, random dots of very thin brown acrylic wash (Americana Mississippi Mud) were applied to add some variation and give the "grass" a more natural look.
The unit is painted to represent the English 3rd Regiment of Foot (a.k.a. the Buffs) although with figures this size, it's very difficult and, frankly, unnecessary to attempt to paint such distinctions as lace as all such detail becomes invisible when viewed at normal playing distances. The effort here was to paint figures that look good on the table without becoming a "button counter."
What's All This?
I intend to use this blog to track my progress in creating wargaming armies using 10mm figures from Old Glory Miniatures (the Grand Scale 10/ Magnificent Little Soldier Co. 10s range.)
Right now, I have two projects going: I'm slowly painting units for the War of Spanish Succession and the American Civil War. Both of these are being created to use with the newly published Field of Battle rules by Brent Oman from Piquet. I'll be posting pictures of the few units I've finished very soon.
![]()